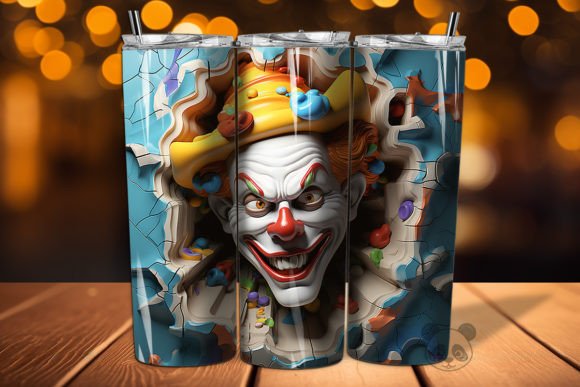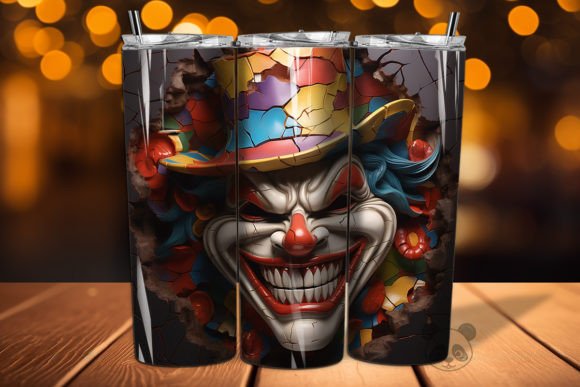
3D Clown Cracked Hole Tumbler Wrap 25: A Guide to Flawless Sublimation Results
The world of custom drinkware is saturated with generic florals and basic geometric patterns. Standing out requires designs that capture attention immediately, and few motifs achieve this quite like the surreal, high-contrast aesthetic of a 3D Clown Cracked Hole Tumbler Wrap. This specific design, often categorized under unique digital assets for sublimation, offers a striking visual experience. However, possessing the file is only half the battle. Many creators stumble not because the design lacks quality, but because they misunderstand the technical requirements of applying a complex 3D illusion to a curved surface.
If you are considering purchasing or using the 3D Clown Cracked Hole Tumbler Wrap 25, it is vital to approach the process with precision. This guide addresses common pitfalls in selecting, preparing, and printing these digital files, ensuring your final product matches the vibrant promise of the preview image.
Misunderstanding the "3D" Illusion in Flat Prints
The most frequent mistake beginners make involves the expectation of physical depth. When you download a 3D tumbler wrap PNG, it is crucial to remember that you are receiving a two-dimensional image designed to trick the eye. The "cracked hole" effect relies entirely on shading, perspective, and high-resolution detail. If you print this on low-quality paper or use incorrect heat settings, that illusion collapses into a muddy, flat graphic.
To preserve the integrity of the Clown 3D seamless pattern, you must prioritize print resolution. The included file is typically provided at 300 DPI (dots per inch), which is the industry standard for crisp sublimation. Printing at anything lower, such as 72 DPI web resolution, will result in pixelation that destroys the realistic cracks and shadows. Always verify your printer settings before hitting print. Ensure your software is set to "High Quality" or "Photo" mode, and disable any color correction features that might alter the intended dark tones of the cracked background.
Ignoring the Specific Dimensions of Skinny Tumblers
A significant oversight occurs when creators assume one size fits all. The 20 oz Skinny Tumbler Sublimation Design has very specific dimensional requirements. The 3D Clown Cracked Hole Tumbler Wrap 25 is optimized for a straight, skinny tumbler profile, usually measuring approximately 9.3 inches in height and 8.2 inches in width. Using this wrap on a tapered tumbler or a standard 20 oz mug will result in distortion.
When the image stretches over a tapered surface, the clown’s features and the cracked texture will warp unnaturally. This breaks the immersion of the 3D effect. Before purchasing or printing, measure your blank tumblers precisely. If your tumbler is not a straight-walled skinny model, you may need to adjust the canvas size in your editing software, though this can compromise the design's composition. The best approach is to match the blank to the design, not the other way around. Stick to straight-walled 20 oz skinny tumblers to ensure the Clown seamless pattern aligns perfectly without unwanted stretching.
Overlooking Background Transparency and Edge Bleed
Digital downloads for sublimation often come with transparent backgrounds, but this can be a double-edged sword. The Clown background in this design is integral to the aesthetic. If you accidentally place the PNG over a white layer in your design software, you will lose the depth of the cracked hole effect. The dark, textured background provides the contrast necessary for the clown figure to pop.
Furthermore, many users forget to account for the seam. When wrapping the paper around the tumbler, there will be a overlap. If the 3D Clown design does not have enough bleed area, you might end up with a visible white line or a cut-off image at the seam. Always check the edges of your PNG. If the design is not a true seamless pattern, position the main focal point—the clown’s face—away from the seam area. Center the character on the front of the tumbler, allowing the cracked texture to handle the overlap at the back where it is less noticeable.
Neglecting Color Profile Management
Sublimation printing is notorious for color shifts, particularly with deep blacks and vibrant reds found in Clown watercolor styles. A common error is designing and viewing the file in RGB mode while printing with a CMYK-based workflow without proper conversion. While sublimation printers often use specific driver profiles, ignoring color management can lead to dull results.
The Clown png file likely contains rich, saturated colors. To maintain vibrancy, use high-quality sublimation paper and ink. Cheap paper absorbs too much ink, causing bleeding that blurs the fine details of the cracked texture. Additionally, perform a test print on a small piece of paper to check color accuracy. If the blacks appear gray or the reds look orange, adjust your printer’s color density settings. It is better to waste a small sheet of paper than an entire tumbler blank.
Skipping the Pre-Press Preparation
Even with a perfect 3D design, poor application technique can ruin the final product. Many entrepreneurs rush the pressing stage. For a Clown skinny tumbler, consistent heat and pressure are non-negotiable. If the heat press does not apply even pressure around the circumference, parts of the Clown wrap may appear faded or blurred.
Use high-temperature resistant tape to secure the sublimation paper tightly against the tumbler. Any gaps between the paper and the metal surface will cause ghosting. Ensure the tumbler is pre-heated to remove moisture, as steam can create spots that disrupt the seamless pattern. Follow the recommended time and temperature for your specific tumbler coating, usually around 380°F for 180-200 seconds, but always consult the blank manufacturer’s guidelines.
What to Check Before You Buy and Print
Before committing to this design for your business or hobby, review the following checklist to ensure satisfaction:
- File Format: Confirm the download includes a high-resolution PNG (300 DPI). JPEGs often introduce compression artifacts that degrade the 3D background quality.
- Dimensions: Verify the file size matches your tumbler blanks. The standard 9.3 x 8.2 inches is ideal for 20 oz skinny tumblers.
- Licensing: Understand the usage rights. Most digital downloads allow for commercial use on physical products, but reselling the digital file itself is prohibited.
- Software Compatibility: Ensure you have software capable of handling PNG files with transparency, such as Photoshop, Illustrator, or free alternatives like GIMP or Canva (with care).
By addressing these technical nuances, you transform a simple digital download into a premium physical product. The 3D Clown Cracked Hole Tumbler Wrap 25 offers a unique artistic edge, but its success depends on your attention to detail. Avoid the common traps of incorrect sizing, poor color management, and rushed pressing. With the right preparation, you can deliver a stunning, professional-grade tumbler that stands out in a crowded market.